colors and codes - choos your color code from here
#FFFAFA
#FFF5EE
#FFF0F5
#FFFAF0
#FDF5E6
#FAF0E6
#FFFFF0
#FFF8DC
#FFFACD
#F5F5DC
#F5F5F5
#F8F8FF
#E6E6FA
#F0F8FF
#F0FFF0
#F5FFFA
#F0FFFF
#E0FFFF
#FFE4C4
#FFDEAD
#FFE4B5
#F5DEB3
#DEB887
#D2B48C
#00FFFF
#00FFFF
#40E0D0
#5F9EA0
#008B8B
#008080
#DCDCDC
#D3D3D3
#C0C0C0
#A9A9A9
#808080
#696969
#000000
#708090
#BC8F8F
#FFB6C1
#FFC0CB
#FF69B4
#FF0000
#DC143C
#B22222
#A52A2A
#8B0000
#800000
#FA8072
#E9967A
#FFA07A
#F08080
#CD5C5C
#FF6347
#FF7F50
#F4A460
#FFA500
#FF8C00
#D2691E
#A0522D
#8B4513
#F0E68C
#BDB76B
#DAA520
#FFD700
#FFFF00
#808000
#6B8E23
#32CD32
#00FF00
#ADFF2F
#7FFF00
#7CFC00
#00FF7F
#98FB98
#90EE90
#2E8B57
#228B22
#008000
#006400
#B0E0E6
#ADD8E6
#87CEEB
#00BFFF
#1E90FF
#4682B4
#4169E1
#0000FF
#00008B
#191970
#6A5ACD
#D8BFD8
#DDA0DD
#EE82EE
#DA70D6
#FF00FF
#FF00FF
#9932CC
#8A2BE2
#800080
#8B008B
#4B0082
add orkut share button in your website or blog
copy below codes and paste it in Edit Html where you want..
| <div id='orkut_share' style='width:100%;'/> <script src='http://www.google.com/jsapi' type='text/javascript'/> <script type='text/javascript'> google.load('orkut.share', '1'); google.setOnLoadCallback(function(){ new google.orkut.share.Button({ style:google.orkut.share.Button.STYLE_REGULAR }).draw('orkut_share'); }, true); </script> |
facebook share button for your website or blog
copy the below codes and paste it in EditHtml where you want
| <a href='http://www.facebook.com/sharer.php' name='fb_share' type='button_count'>Share</a><script src='http://static.ak.fbcdn.net/connect.php/js/FB.Share' type='text/javascript'/> |
How To Add leaderboard Adsense ads between Header and Post Section in blogspot
2.Click on "Expand Widget Templates"
3.Scroll down to where you see this:
4.Now replace above code with below code.
5.Now save your template.
6.Go to Layout > Page Elements
7.Now Click on new 'Add a Gadget' option that will now have appeared between Blog Posts and the Header.
8.Select 'HTML/Javascript' and add your 728x90 leaderboard Adsesne code and click save.
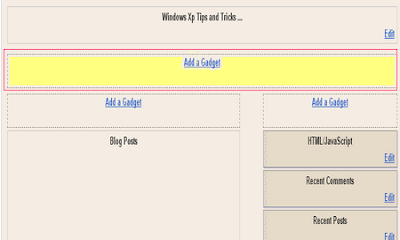
Recent Posts with Thumbnails for blogspot
Some samble of the Gadget with different configurations

Creating a Table Of Post titles
content of a book wishing in reading. The question possibly emerge is what is his
relation between books with blog? there is, do not only a book
that can make the table of contents, in a blog even also we can do it,
Here are two steps to make a Table Of content at the blog :
Step #1
- Login to blogger with your ID.
- After entering the dashboard page , click Layout.
- Then click edit HTML tab.
- Click the Download full template link. Save your template.
- Please mark the little box beside Expand Widget Templates. Wait for a moment.

- Go to your template code, and find the code like this :
<b:include data='post' name='post'/> - Delete above code, and replace with the following code :
- Click Save Template button
- Done.
Step #2
- Click at Page Element tab.
- Click at Add a Page element.
- After emerging pop up window , Klik add to blog button for the things HTML/JavaScript.
- Copy and paste the code below into available column :
<a href="http://YourBlogName.blogspot.com/search?max-results=200">Show all post »»</a> - Alter YourBlogName with your blog name.
Example : my blog name is rohman-freeblogtemplate. Alter 200 with other number, - Click

- Done Please look the result.
Create images uploading via Blogger by newerclick
A efficient method and failsafe method. All one need to do is after uploading an image via Blogger image upload icon to switch to Edit HTML mode if one is not already in this mode.
Now depending on which post editor you had use, the HTML codes used to display images that Blogger generate upon uploading is different. We will deal with the old post editor (my preferred post editor) first as it is easier to explain and deal with the new updated post editor later:
codes 4 the old post editor:
Please note that only the code in black is needed to display the image. Those highlighted in red are not needed to display the picture and can be removed safely leaving only
make the image not clickable, all you need to do is just to delete those codes highlighted in red. I have tested that successfully over at Test to make images uploaded via Blogger not clickable.
new post editor
The new post editor which is not my preferred post editor. The codes to display the uploaded image generated by Blogger with the new post editor is as follows, again with the code to display the image in black while the codes in red are to make the image clickable to display an enlarged image. The codes in blue is to center the picture and can either be removed or left in place (note: center will be replaced by left or right if you had elected to float the image to the left or right but that will not affect the explanation to make the image not clickable):<a href="https://blogger.googleusercontent.com/img/b/R29vZ2xl/AVvXsEgmKqYwIjiyA8HuSes-m1pjIOXIYD9h37IBViNLZKRPHIuXY3R3OpnmrGQu1LcGtAeH3GYufs44S9ihE5K2PBxVFfiZ9Dtppa97l7D34kdJzQzwpQywcajfR7HHDcFLw_vCNYIF2eMcKlWM/s1600/BlogStar.gif" imageanchor="1" style="margin-left: 1em; margin-right: 1em;"><img border="0" src="https://blogger.googleusercontent.com/img/b/R29vZ2xl/AVvXsEgmKqYwIjiyA8HuSes-m1pjIOXIYD9h37IBViNLZKRPHIuXY3R3OpnmrGQu1LcGtAeH3GYufs44S9ihE5K2PBxVFfiZ9Dtppa97l7D34kdJzQzwpQywcajfR7HHDcFLw_vCNYIF2eMcKlWM/s320/BlogStar.gif" /></a></div>
The code in black is needed to display the image while those in red are used to make the image clickable to enlarge the image while those in blue is meant to center the image. Thus if you want the image not clickable, just delete those highlighted in red (<a....> and </a>) and those highlighted in blue too leaving those in black intact and the image will still be displayed. Alternatively we can just delete those codes in red to make the image unclickable while leaving those in blue intact to center (or float) the image.
Making Random Posts Widget for Blogger with Thumbnails

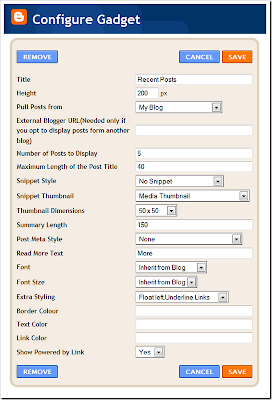
About the Various Options
Maximum Length of Post Title – Your post titles can be too long. In that case you can limit the title to x number of characters using this parameter.
Snippet Style – You can display the snippet with Post Summary, Post Thumbnail , or both or none.
Snippet Thumbnail – When you upload photos from your PC to blogger using the Blogger Post Editor, Blogger generates a Media Thumbnail of size 72 X 72 px. If you add external images to your blog posts, then Media Thumbnails will be generated. If media thumbnails are not present, the post will be scanned for images or YouTube videos. You can specify which images to use by using this option. The No Image Thumb is a default image which will be used if post has no images or videos(you can turn this off) .
Note:- If you want to grab the images or YouTube thumbnails, then you should have “Site Feeds” set to Full. If you opt for the Media Thumbnail only, then the short feed will be used by default.
Thumbnail Dimensions – Size of the Thumbnail in pixels. The gadget doesn’t generate any Thumbnail. It just uses the media thumbnail,YouTube thumbnail , or any image in the post and scales it to the specified dimensions
Summary Length - If you have opted to display the post Summary, then you can control the length of the summary(in characters)
Post Meta Style – You can display the Post Date, Comment Count and a Read More Link.You can choose any combination of these three.
Font and Font Size– By Default, the container’s font and Font Size is inherited into the Gadget. But if you are using a 3rd party template, then these might not be properly inherited. In that case you can use this Option to over ride these parameters.
Extra Styling – Allows you to specify the position of the Thumbnail, and whether to underline the links or not.
Border Color – You can either opt for No Border, or select one of the 140 available colors. If you are not sure about how these colors look like, then take a look at this color chart at W3Schools - http://www.w3schools.com/html/html_colornames.asp
Link Color and Text Color – By default , the colors will be inherited from your Blog. If you want to override this , you can choose one out of the 140 different colors.
(The colors were provided in the Dropdown(and not as text fields) to tackle a problem with the API)
Read More Text – This field was intentionally added to help blogs which are not written in English. Initially i used “More »” as the Read more text without taking any user Input. Seeing this on a non- English Blog is a little awkward. So i added this new field :)
How can Put ads below your post title in blogger
Blogger has nice simple layout’s having a sidebar at either sides of the posts.But we hardly find a click on them since users dont bother to even look at them.To make the users atleast to have a look at the ads we must try to make them blend with the posts.For making the ads appear below the post title,do the following steps..
First goto layout and then click edit HTML.Save your full template first should anything go wrong in the doing.
Click on expand widget templates(check it).
then scroll down to nearly 2/3rd of the template and find
Use ctrl+f to find the above line easily.
After you find the above line just paste your adsense code just above that line.
But before you do that you need to parse your code and for that you need a code parser.
Paste your adsense code in the space provided ( got to the link given above) and wait for the process to be completed.
Once that is completed copy the parsed code and place it just above
Save your template.
Note that this doesn’t apply to your home page.
Ads appear below the post title only when you view an individual post.
Many people follow this trick and generate a good revenue from this channel.Google has a note on that saying showing ads below the post title misleads the users in thinking that ads are a part of the post and hence asked webmasters to use a ‘advertisement’ or a ’sponsor’ word above the ad.
Make recent posts widget for blogger blog
see at the below screenshot

Creating recent Posts Widget Using FeedBurner :
- Log in to your Feedburner account and click on your feed.
- From your blog’s feed menu, go to Publicize.
- Click on BuzzBoost and enable the service.

- Get the HTML code from there.
- Remember that you can choose to show post titles or post titles with summery.
- Go to your blogger blog’s Layout >> Page Elements >> Add a Gadget >> HTML/Java Script and paste the code there.
- Click on Save to save the widget.
- You are done.
Making Recent Posts Widget With Blogger Gadgets :
- Log in to your blogger blog‘s dashboard.
- Navigate to Layout >> Page Elements >> Add a Gadget >> Feed

3.Enter your blog feed URL in the given box.
- Give a proper title to your recent posts widget by filling up the Title field.
- Choose the no of recent posts that you want to show on your blog.
- If you want to display date next to the post or if you are having different authors on your blog, choose the corresponding check boxes next to them.
- Save your widget and you are done.
That’s it. Using the above two simple tricks will show recent posts on your blogger blog. You can also show all posts including sticky posts on blogger using these widgets. Now displaying all your latest or recent posts on your blogspot blog’s homepage is quick and easy. In this way, you can also add recent comments widget on blogger blogs.
dropdown menu for blog or website
follow the step, completely copy the below codes and edit as your menu links and paste in-Layout as HTML gadget
if you would like to change color,width for your dream Drop Down Menu ,you can use below codes


